Custom Color with Smooth Lime Plaster and Pigments
Plastering over conventional paint
Using Smooth Lime Plaster and Pigment
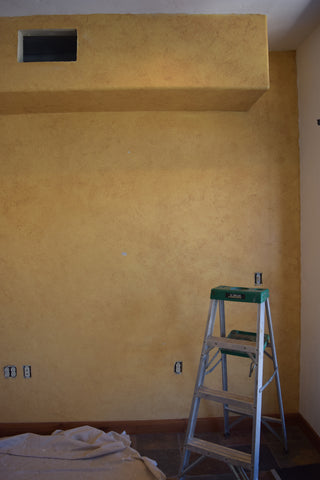
BEFORE:
VISION:
A dark blue that will blend well with the tile and teak on neighboring walls

PRODUCT:


-250 g. of Ultramarine Blue pigment
-50 g. of Iron Oxide Black pigment
-10 kg. bag of Smooth Lime Plaster
We chose Ultramarine Blue and added a little Iron Oxide Black to darken and dull the blue. All Unearthed plasters can be tinted up to 5%, by weight. Since we are using a 10 kg. bag of Smooth Lime Plaster, we can use up to 500 g. of pigment (10 kg. x 5% = .5 kg. or 500 g.) For this project we decided to use 300 g of pigment total.
SUITABLE TOOLS:
- Quality trowels
- Buckets (for mixing product, cleaning trowels, and extra clean water if needed)
- Drop cloth
- Mixer (a second, smaller mixer may be desired for mixing pigments)
- Gloves (this product is high in lime and dries skin out)
- Saran Wrap
- Painters tape
HOW TO:
Mix your pigments together and work in a little water.


Next, you'll want to mix your plaster in with the pigment, doing so by slowly adding more water and plaster.


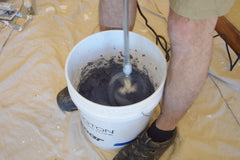
Don't forget to mix thoroughly, from top to bottom, and scrape your edges to avoid clumps.


If using mix-in's, add them now once the pigment and plaster are mixed thoroughly, free of any clumps.

Once everything is mixed together well, let the plaster sit, covered with Seran Wrap, for 20-30 minutes.
While product is setting, clean your mixer in a spare water bucket so no plaster dries on the mixer, later creating dry clumps.
After the product has set, mix again thoroughly. You are now ready to apply.
Apply using standard plastering techniques.


Making a second batch of plaster with pigment
If you have some plaster left over from your first batch of the day, use it! If it's been longer than 24 hours, start in a fresh bucket and pitch the old plaster.

Measure your pigment out again. Mix the pigment in with some water and add this to your bucket from the first batch (if using).
Then, slowly add the plaster and water to the pigment mixture, stirring until all clumps are gone.


Be sure to scrap off the sides of the bucket, mix again, and let sit for 20-30 minutes covered.
Once the product is done setting, mix again thoroughly and apply.
NOTE:
There will be color variations in the plaster as it's drying.

AFTER:

*note this wall has a slightly marbled appearance. This is not normal and only happens if water is applied to the product once it is on the wall. If this is your desired look, we recommend using a spray bottle and applying a tiny amount of water while working with the product on the wall. Otherwise, avoid contact with water once the product is applied and while it is drying.